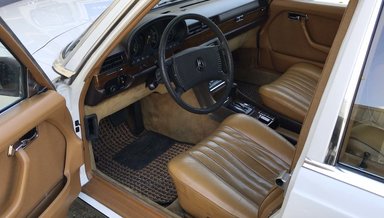
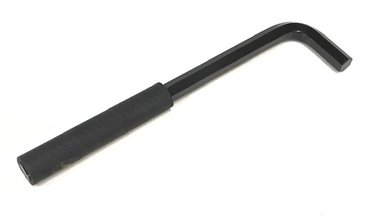
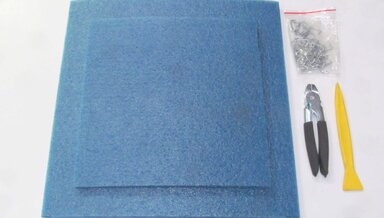
Front Seat Padding Booster Kit
If you have a reasonably good front seat bottom that is just a little HARD to sit on for any length of time then this "booster" kit may help solve your problem.
Kent's Factory Service Manuals collection is going on sale now. CLICK HERE.
If you have a reasonably good front seat bottom that is just a little HARD to sit on for any length of time then this "booster" kit may help solve your problem.
Our seat spring repair kit has been a great success! It can easily repair sagging on broken front seat springs. But what about seat padding. A lot of the older ( 1970's to 1980's glued fiber seat padding can crush down and even disintegrate over time.
Kent finally went to work to solve the problem of rusty water pump mounting bolts. Once the problem was studied carefully the solution became obvious. Watch the video for a full explanation and partial instructions below.
Kit contents:
Keeping your throttle linkage ball sockets and pivot points lubricated extends the life of the parts and maintains top performance for the engine as well as some of the later transmissions.
This video will show Kent's technique on how to prime and paint alloy wheels using our wheel paint kit and masking dam that we sell separately. See below. The techniques will also apply to any spray can paint you should choose to use.
Want the best, fastest, and easiest way to polish faded anodized aluminum trim, to remove fine scratches from your glass, to loosen rusted and stuck fittings and bolts, and to sand rust out of tight places? - enter the multitool or multi-function tool.
For a number of maintenance operations, you need to be able to turn the engine over by hand. This includes valve adjustment, timing chain replacement, injection pump timing on diesel engines, checking and setting internal engine timing, draining the torque converter, and others.
This is a full 25-minute step-by-step instructional video on how to properly flush or bleed your brake system using our pressure brake bleeder and fluid capture tank.
If you already have a multi-function tool or you plan to buy either our glass or anodized aluminum polish kit ( see below ) you really don't need a second tool unless you want to dedicate one just for "banging" on rusty fittings and bolts. We offer this same kit with the tool included.
In this video, Kent explains the correct procedure for cleaning and lubricating your hubs and rear brake rotor BEFORE you install your wheels. He hardly ever sees this done when removing wheels on 15 plus-year-old Mercedes so he knows it is almost ALWAYS neglected.
This tank works amazing! Put in the heavy rear end or trans fluid. Pump up the pressure. Stick the non-fall-out end in to fill hole... and just push on the valve in the handle of the filling wand.
Kent came up with this kit because of all the times he replaced e-brake shoes only to end up with battered knuckles and extreme headaches. This video is included free with the purchase of the toolkit.
This video is intended to be used as instructions when purchasing Kent's Rust Buster Tool. It can be viewed separately but you will need the tool to apply the principles. This video is included free of charge when purchasing the tool. See related products below:
Have you dreaded changing the rear end fluid before because it is a pain and ends up being really "messy?" Kent finally decided there had to be a better way so he went to work and came up with the idea of using a simple and affordable custom made pressure tank to "flush" and refill differentials
This video will take all the "mystery" away... For all W116, W123, and W126 Turbo Diesel 5
One day Kent "finally had it!" Replacing parking brake shoes was always a dreaded job. As he thought about it he realized the frustration was mostly due to the hassle of getting all the holding springs on and off. So he set out to develop a new tool.
These are Kent's favorites. As shown in this video on youtube. Pack of 5 shipped.
Maybe you have even tried this only to have to patch fall on the floor when you walk away... ( it has happened to Kent... :-) ).
NOTE: Ships UPS ground only. Select ground for entire order to save in shipping costs. I am a great fan of LubroMoly products.
This can happen when you least expect it! It happened to me right when I purchased a W109 300SEL and it can be really frustrating.
This super fine cloth along with Miracle Paint can really do some fine rust repair detailing. You can use it on a rough pitted area that you want to smooth out. Put on a couple layers of cloth and coat with Miracle Paint. Let dry and block sand.
This is a must-have if you have a prized Benz or any car you don't drive often!! If you let any of your cars sit for long periods ( generally over 30 days) without driving them, you can ruin your battery, especially if you let it go completely dead.
I do not need to say much about this tool. Well made and well thought out. Someone who obviously was frustrated at scratching the finish on his or her alloy wheels came up with this idea. Watch the video below to see why this is now my favorite go it 17 mm lug bolt socket.
Works on W114, W115, R107, W116, W123 and W126. A better performing and more comfortable 14mm hex wrench to use when changing the fluid in your rear end. Will work on manual transmission with 14mm drain plug only. Watch the video to see why.
These are the instructions that come with our black engine and chassis paint restoration kit, but they will help you successfully spray paint almost anythings. These step-by-step techniques were developed by Kent over almost 60 years of spray painting cars and parts.
UPS GROUND ONLY: This is the best spray can paint Kent has found to detail the semi-gloss black parts on your Benz. It is not easy to find a good spray can paint!
This on-demand training video will walk you through the steps you need to follow in order to get your headliner panel off so you can work on the sunroof. If your sunroof won't open, you are stuck - right? Not SO according to Kent.
If you have been enjoying Kent's free Youtube videos but have not yet purchased and watched one of his on-demand "meat and potatoes" videos, we guarantee you are really missing something.
This is the best tool we have found to remove the chrome side trim strips and snap type door panels on may of the older models from the mid 1960's to the mid 1980's.
This video will show you to details on how to use Kent's custom rear end and manual transmission drain plug wrench. These 14 mm plugs were used on almost all manual transmission and rear ends from the early 1960's up to the mid 2000's.
If your early door lock actuators do not have any cracks in the rubber diaphragms, but they just won't hold vacuum - it may be possible to fix them by taking them apart and cleaning and resealing the outer lip of each diaphragm.
In this video instruction Kent will show you how he installs our battery tender kit in a W124 Mercedes.
Over the years I have used lots of different methods to clean off rust before applying Miracle Paint. This is the best and quickest method I have found. This is a great tool that can be used for many other things like cleaning off brake hubs and rotors.
DOES NOT INCLUDE HOOD PAD --- This special glue is very hard to obtain and has doubled in price since 2021 when it could not be found. This kit includes everything you will need to successfully install a new foam hood pad in your older Mercedes.
We have been looking for a long time to find a super strong and well made tool to adjust those tough 17 mm ball adjuster sockets on the early 4 and 6 clyinder gas engines.
I have always dredded replacing a hood release cable. Finally on the last one I did, I decided to do something about those feelings.
This U.S.A. made 17 mm 8 inch long combination wrench is custom modified here in our shop to help you easily install Bilstein front and rear shocks on most of the older model Mercedes Benz.
In this video instruction, Kent will demonstrate how to check for one possible source of a mysterious front end clunking sound. Any clunking noise you hear when driving over rough ground or when braking should be investigated immediately.
After years of "fighting" fuse replacement, Kent finally decided he had had enough! And so was born another special tool. It is designed to securely grab hold of a ceramic fuse, remove it from it, and replace it with minimal exertion and no damage.
These are the instructions that come with Kent's brake pad and brake caliper service kit. It is possible to make your own service kit by watching this video. To purchase the kit see related products below. To learn more about the importance of this kit watch the video below:
Brakes are one of the most often neglected maintenance items on older cars. This is not just related to Mercedes Benz. Most owners don’t realize that brakes need special attention and service not only when pads are changed but every 2 years.
If you have a 1985 or older Mercedes Benz it is time you flush that old automatic transmission fluid out of the system and replace it with a good power steering fluid. ATF formulations have changed over the past 20 years.
This is a collection of SPECIAL tools Kent has put together to help you grab, twist, and pull on things in and around your Mercedes. He makes each one of these tools right here in his shop.
This is a very high quality finish wrench set. The 13mm combination wrench that is 8 inches long. The 17mm has a ratcheting box end great for alternators, bumpers, etc. and is 11 inches long. The 18mm for 1996+ models is also 11 inches long.
Want to try to make your car's engine and engine compartment look like it just came off the showroom? Would you like detailed information on the chemicals, brushes, tools, and procedures Kent uses to get his engine compartments looking so nice?
These are all 3/8 inch drive hex sockets. All are the same length 11 cm total length. These are great to have with the short hex just won't reach long enough.
The 1/4 inch drive sizes include 2, 2.5, 3, 4, 5, 5.5 and 6mm. The 3/8 inch drive sizes include 7, 8, 9, 10, and 12mm.
Removing the tilting sunroof panel is a little bit of a mystery to many owners. Since there are no exposed fasteners, at first glance it can appear to be very difficult to remove.
Indications that your seal needs replacing are tears in the lip and no resistance when you close your trunk. If you trunk snaps shut too easily it means the seal has collapsed and is no longer sealing properly.
Instructions to complete a diesel system purge. Does not include instructions on changing the filter