This is PART 3 of Kent’s three part video series on troubleshooting and repairing a very common shifting problem in the 1996 to 2006 Mercedes 722.6 five (5) speed automatic transmission. The entire video series is included free of charge when you purchase the 722.6 limp home mode repair kit from Mercedessource. This transmission was installed in many chassis including the W202, W203, W140, R129, W210, W208, W220, W215 chassis also referred to as C-Class, E-Class, S-Class, ML-Class, SL convertibles, and SLK class( Note: NOT all models during those years have the 722.6 transmission. If you are not sure if your Mercedes has this transmission, please call your local Mercedes dealer and give him your vin number. A dealer can confirm which transmission you have installed in your car.
Get it for Free! This is available as a free add-on item. Review the product details for bundle options.
Product Details
Here is a summary of Kent’s three part video series:
Part 1: This is an introductory video that will address the problem and the options for repairing it. If a 722.6 transmission won’t go out of second gear it is trying to tell you something is wrong. This is a built it safety feature that will prevent destroying the transmission (limp home mode). Kent will explain why most shops want to rebuild or replace the transmission and how you can repair it yourself for less than 10 percent of the cost of replacement. If you are getting a check engine light, Kent will show you how to use a simple code reading to pull the code or codes out of the computer and how to find out what they mean. Not every failure of this type will throw an error code. Kent goes over the reasons why you may want to attempt this repair even if you are not sure the conductor plate is the main problem with your transmission.
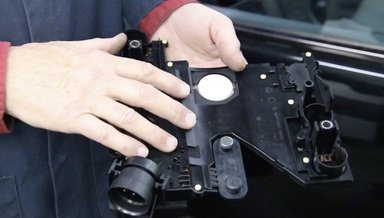
Part 2: Kent walks you through the steps of carefully removing the valve body from the transmission, placing it on the bench and removing the old conductor plate, inspecting it for damage, and properly installing the new conductor plate onto the valve body. This procedure has to be done on a VERY CLEAN workbench and special care must be taken to avoid any dirt particles from getting on the valve body or conductor plate. No specific instructions are included for removing the transmission pan and old gasket. A new filter and gasket should ALWAYS be installed ( see related products below )
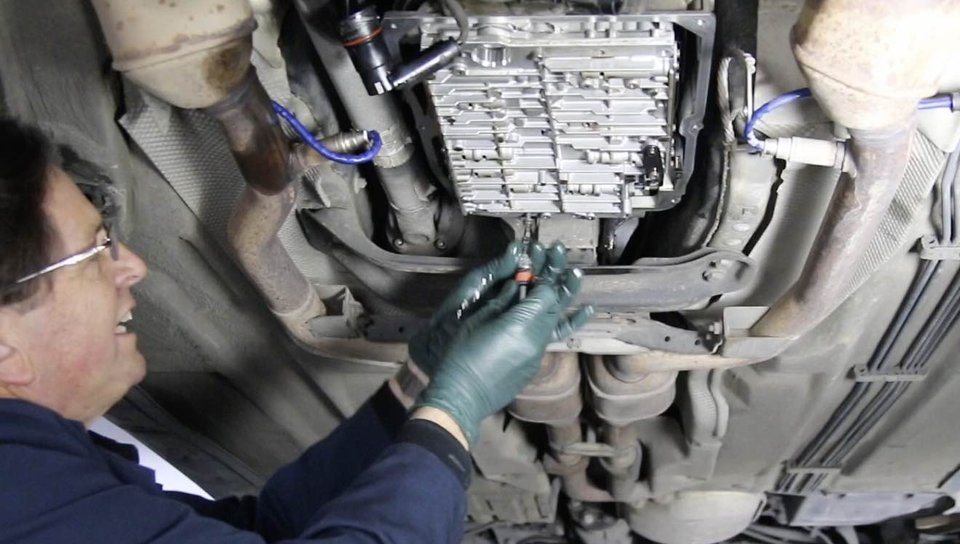
Part 3: Kent gets back under the E320, makes certain every part and bolt is super clean including the mounting flanges, reinstalls the valve body back in the transmission, shows you how to properly torque the mounting bolts, demonstrates how to install the new wiring plug, talks about the location of the new transmission filters, and explains refilling the transmission with the proper fluid in preparation for a test drive. Note: No specific instructions are included on replacing the transmission gasket and pan. WARNING: After replacing the conductor plate you will need to have the transmission error codes removed and the computer reset. In this video Kent recommends transporting your car to a dealer or independent mechanic to have this done ( most shops will charge $90 to $150 for this service). You might want to arrange this before you start the repair. For advanced DIYers there are diagnostic tools available that can allow you to do this. Some are expensive, while others have a long learning curve. This market is constantly changing so no information is included in this video on how to clear the transmission error codes yourself. If you want to try to go this route do your own research here. If an easy to use and inexpensive scan tool becomes available Kent may add a fourth video
SPECIAL NOTE: For clarity this video series was filmed with a 2000 E320 Wagon on the lift. If you do not have access to a car lift, you can still do this repair in your garage by raising all four wheels off the ground. No instructions are included in this video series on how to jack up and support your car for this type of transmission work. For safety, Kent prefers to put the front end up on car ramps and the rear up on secure jack stands while leaving the floor jack under the rear differential for added safety. NEVER REMOVE THE TIRES when doing this type of “ground” work and NEVER support the car with just a floor jack!
Refilling the transmission: Most of these transmissions do not come with a dipstick. Some have been modified with an aftermarket upgrade. You will need a dipstick measuring device when you are finished with this repair in order to add the correct amount of transmission fluid. If you do not have one we offer a measuring and inspection kit with instructions ( see below ). We do not carry transmission fluid but be sure to ONLY add transmission fluid specifically made for the 722.6 transmission.
How to view this on-demand video:
Once you complete the purchase of this video you will be able to view it immediately when you are logged in and on your personal account page (click on My Account). The video(s) will show up under My Video Manuals. The video is NOT downloadable to your computer or mobile device, but you will be able to view it anytime, from anywhere and from any device as long as you have internet access and you are logged in to your account at mercedessource.com.
Important note: This video manual may or may not include all the information you will need to troubleshoot and/or repair your specific problem/s. Please read the full description carefully to determine if this video is applicable to your year and model and contains the information you are looking for. If not, please refer back to our "Solutions Finder" and enter your chassis number and the specific problem you are having to see if we offer a solution.
Related Products:
1996 to 2006 722.6 Transmission: Do You Really Need to Replace It? - On Demand Video
This is PART 1 of Kent’s three part video series on troubleshooting and repairing a very common shifting problem in the 1996 to 2006 Mercedes 722.6 five (5) speed automatic transmission. The entire video series is included free of charge when
Removing the 722.6 Valve Body and Replacing the Conductor Plate - On Demand Video
This is PART 2 of Kent’s three part video series on troubleshooting and repairing a very common shifting problem in the 1996 to 2006 Mercedes 722.6 five (5) speed automatic transmission.
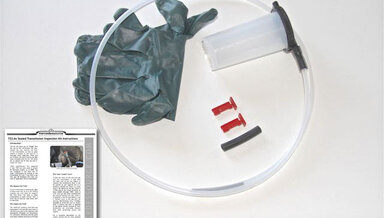
722.6 5-Speed Transmission Fluid Measurement and Extraction Kit
Do you own a 1998 to 2006 Mercedes with the 5 speed automatic that has the MB WORKSHOP ONLY locked cap on the top of the transmission fill tube? Have you wondered how you are ever going to be able to check the transmission fluid??? Kent has come up with an inexpensive answer for the D.I.Y.