D.I.Y. Engine Removal Checklist for 1985 and Older Mercedes Diesels
Not all that difficult if you have an engine hoist, ramps, tools and Kent's checklist
There are a number of reasons for removing an engine from an old diesel: rebuilding, replacement, restoring, repairing and detailing. Feel free to print out this checklist and use it as a step-by-step guide anytime you plan to do the deed. CLICK ON READ MORE. Kent Bergsma
Diesel Engine Removal Checklist:
Preparation Planning
Have engine steam cleaned or pressure washed if at all possible.
If air conditioning is charged take it to an A/C service facility to have refrigerant evacuated.
Before Raising the Car.
1. Disconnect battery
2. Remove and plug both fuel lines going back to the tank
3. Remove radiator cap
4. Disconnect exhaust system at manifold (only needed if raising the car on a lift )
Raise Car to workable height ( wheel ramps or car lift )
NOTE: No lift available? Then place front wheels on ramps - rear wheels on ramps or high with hack stands. Do not remove tires and wheels when working under the car.
Working under the car: start from the rear and work forward.
- Remove exhaust system hangars and U shaped support mounting clamp (near bell housing) and pull out complete exhaust system
- Remove exhaust heat shield ( only required on the W126 )
- Loosen driveshaft center nut with rear wheels locked either on ramp or emergency brake on (4 or 5 turns is adequate)
- Remove two bolts for rear transmission rubber mount
- If you are working on the ground you will need to have one wheel off the ground to remove the driveshaft flex disk
- Support that one side by a jack stand if needed
- Jack up the transmission using a wide piece of plywood on pan bottom and remove the crossover mounting plate (4 - 17mm bolts)
- Remove bolts (3) flex disk to the rear of transmission - rotate driveshaft to get to all the bolts
- Pry on the flex disk and push driveshaft back and out of the way (pry bar is almost always needed to free flex disk from drive shaft coupling)
- Disconnect speedometer cable ( or sensor wire on W126) at the rear of the transmission
- Unplug or unscrew wire to the kick-down switch (location varies on different models ) cut zip ties that secure the wire to transmission if needed
- Replace cross over mounting plate under the rear of the transmission with bolts halfway in by hand to allow easy remove later
- Lower the transmission back down so rear transmission rubber mount is just sitting on the crossover plate
- Wire fore and aft sections of the driveshaft together so they do not come apart - VERY IMPORTANT
- Disconnect shift rod linkage at the shifter and at transmission and remove from the car (use special Mercedessource clip tool if available)
- Unplug neutral safety switch - later models have a locking clip. Rotate it clockwise and pull the wire plug straight out
- Unplug vacuum line to transmission modulator (not required if hard to get to)
- If you plan to remove the transmission from the engine, remove the six bolts that hold the flywheel to torque converter ( 6 total - 3 pairs of 2 close together)
- Remove ground strap. ( right or left side of engine you will find a strap that is bolted from the transmission bell housing to the lower firewall )
- Remove the subframe cross brace under the rear of the engine if you have a W126 chassis
- Remove steering shock absorber
- Remove motor mount bolts from underneath through hole in subframe ( 8 mm hex )
- If rubber mounts are collapsed use wide plywood under the engine to raise the engine up so you can better access the
- Disconnect engine shocks from the bottom. Hold the bottom of the shaft with small vise grips while removing 10 mm nut
- Drain coolant from the radiator - remove the plug at bottom of the radiator. If none remove the lower radiator hose
- Drain engine oil from engine pan
- Drain transmission fluid from the transmission pan
Lower car back onto the ground
Engine Compartment -
CLEANLINESS: Get a number of drain pans ready to catch the different fluids. For disposal purposes, do not allow them to mix. Place some old cardboard on the ground to catch the smaller drips. Have small zip lock bags and zip ties (or rubber bands) ready to cover the ends of all the hoses you unfasten. This will really help to keep your floor clean!
MEMORY AIDS: You might think you will remember where everything goes but think again. Make notes, label items, put bolts and fasteners in plastic bags and label them with a Sharpie. Take as many pictures as you can, especially of the wiring, linkages, and vacuum lines and hoses. You will thank Joel and Kent if you do this.
FRONT
- Remove fan clutch ( four bolts)
- Remove radiator hoses and drain the excess coolant into pan
- Remove oil filter housing cap and center rod (to allow complete draining of oil)
- Remove two oil cooler hoses at the oil cooler ( drain pan needed)
- Remove fan shroud from behind the radiant
- Disconnect and drain the two transmission cooler lines from the bottom of the radiator (seal with plastic bags and zip ties)
- Remove radiator and oil cooler as one unit
RIGHT SIDE
- Remove air filter housing
- Unplug block heater ( if applicable )
- Unplug alternator wire
- Remove small coolant hose from the water pump housing and drain the coolant into pan
- Some engines will require the removal of a sensor wire on the thermostat housing
- W123 and some others: Remove large A/C hose connections near engine pan and at top of the engine
LEFT SIDE
- Draw fluid out of power steering pump and remove two hoses ( place ends plastic bags and zip tie prevent leaks)
- Remove two fuel hoses to the engine and plug or plug together ( if not done earlier)
- Unplug vacuum lines (mark location before pulling take pictures with a phone to remember)
- Remove throttle linkage
- Remove coolant hose left the rear of the cylinder head and drain
- Unplug wires at glow relay and tachometer amp. Mark locations and take pictures)
- Disconnect oil pressure line at oil filter housing (or unplug oil pressure sensor wire on W126)
- Unplug electrical wire to A/C compressor clutch
- W126 chassis disconnect large A/C hoses
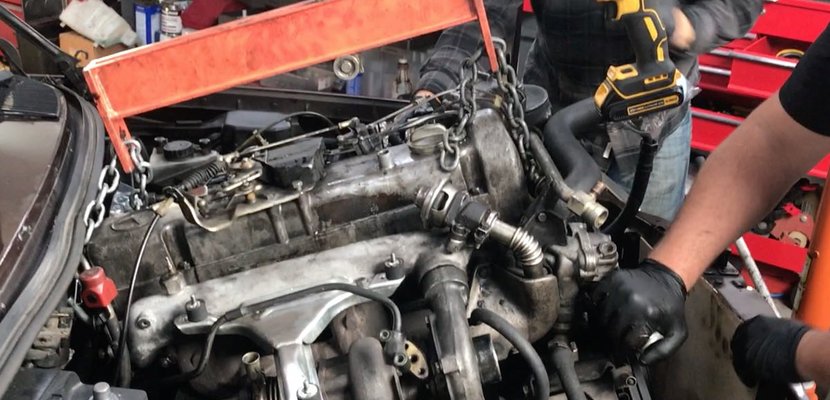
Remove the engine and transmission together as one unit.
This will require a good engine hoist that has a high reach and a heavy-duty long engine “tilter” (See Youtube videos).
PROCEDURE
Hook up the “tilter” to the front and rear of the engine cylinder head. Many engines have connection points in place. Some engines you will have to get creative.
Once hooked up with the engine balanced in the center raise the engine up so it is free of the motor mounts.
- Get under the car near the rear of the transmission and remove the hand tight bolts in the crossover mounting plate and pull the plate out from under the car
- If you do not have the engine balanced you may have to lift the rear of the transmission with a jack to release pressure so you can remove the plate
- Begin raising the engine with the hoist little by little - always checking that everything has been disconnected
- When you get it high enough to access the starter motor (right side) remove the large battery cable and the small wire from the starter solenoid
- This is the easiest way to access this wiring on most models - just remember to reconnect at the beginning of the engine reinstall!
- Begin no to tight and raise the engine at the same time little by little - working back and forth and double-checking your clearances
- Eventually, you will need to have the “titler” adjusted all the way forward
- As the engine comes up you must protect the A/C condenser radiator fins and core. Put heavy cardboard or fiberboard on backside as the engine will hit it
- When you get the engine high enough to clear the front core support, begin moving titler eye rearward to begin leveling the engine
- Once you get the engine high and level enough you can push the car back to clear the engine and transmission.
- For safety immediately lower the engine and transmission to the ground or onto a suitable heavyweight cart.