Leaking fuel injector pumps have become a very common problem in the 60x. engines produced from the mid 1980s to the mid 1990s. The early 60x. group includes the four cylinder (601) engine that came in the 1984-1986 190D 2.2, the five cylinder (602) engine that came in the 190D 2.5 and 300D 2.5 from 1986 to 1993, and the 6 cylinder (603) engine installed in the 124, 126, and 140 chassis 300D / TD (1987 only), 300SDL and 350SDL from 1986 to 1993 and the 606 engine in the E300D from 1995-1999, turbo OR non turbo.
Product Details
SPECIAL NOTE TO CUSTOMERS: We have had many requests from those who already owned the socket asking for just the kit contents. So we now sell this kit without the socket, the socket by itself, or the complete kit that includes the socket. Please see related products below if you need this special tool:
APPLICATION: for the 606 engines, our PDF instructions will not be specifc to some of the minor differences between this and the older OM 601, OM 602 and OM 603 diesel engines. All the general installation information and parts are the same. Here are some detailed pointers in regards to the removal of the intake manifold on the 606 engine that is not covered in our instructions:
******* Removing the manifold on OM606 is not rocket science, but you need to be aware of a little M6 bolt that holds the EGR housing and the inlet pipe together. This one is quite difficult to get to, as it goes up and into the EGR housing. The rest is just disconnecting vacuum hoses and electric socket on EGR housing, remove the exhaust recycle pipe from the EGR housing, loosen all bolts between cylinder head and manifold, and pull up. The EGR housing is stabbed into the intake hose with an oring seal. It is smart to replace this oring: A 606 997 06 45 at the same time if you have oil leak in the area. To get easy access I removed the diesel return hose. The pipes to the nozzles are so long that you just remove the clips and tie them aside with a piece of string. *********
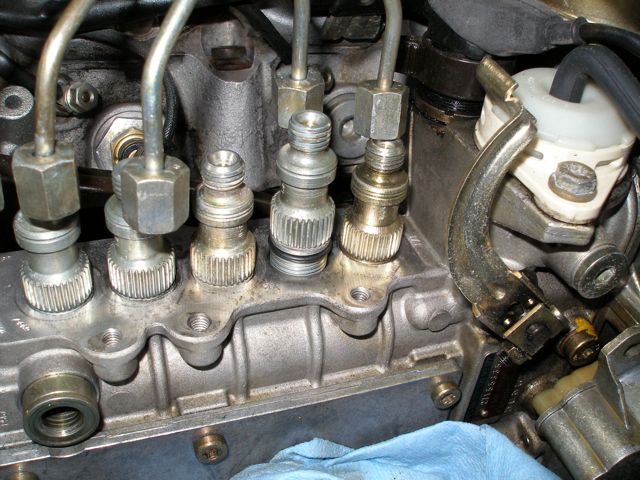
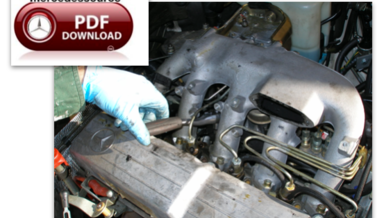
These were Mercedes new class of diesel engines with aluminum cylinder heads. All turbo models can be easily recognized by the flat intake manifold that goes from the turbo side of the engine over the middle center of the engine valve cover. The newer style injection pumps on these engines also have delivery valves on the top of the pump that are sealed with a rubber o-ring. Yup, guess what happens with 15 to 20 year old rubber o-rings? If you have no record of these o-rings being replaced I recommend you do it NOW!
I highly suggest you do it before they start leaking. If you are on a long trip you can really pump a lot of diesel out on the road. I include complete instructions on how to do this job yourself. On most engines it can be done without removing the intake manifold or the injector lines. See image below:
If you are planning to change out your injectors or glow plugs (especially glow plugs) plan to do these o-rings at the same time. When the intake manifold is removed it makes access a lot easier. I cannot guarantee that you can do this job on all 60x. engines without removing the intake manifold. No instructions are included in this kit for removing the intake manifold. The job is time consuming but straight forward. I do recommend you replace the intake manifold gasket if you are planning to remove the intake manifold. Instructions for removing come in my manual on 60x Glow Plug Removal and Repair. Look below to order.
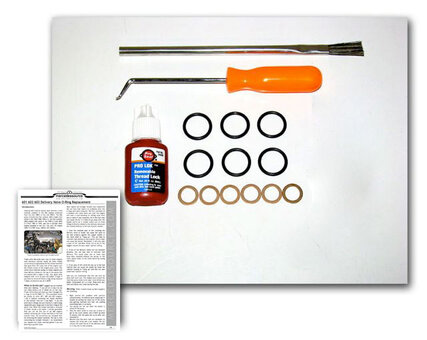
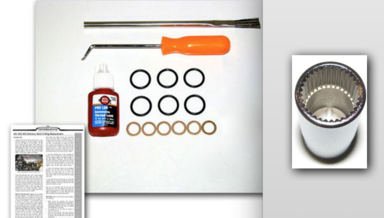
This kit includes the following:
- 6 rubber delivery valve o-rings
- 6 delivery valve housing copper washers (fit below the delivery valves)
- Special pick tool to remove the copper washers
- One cleaning brush
- Thread locking compound
- Step by step illustrated instructions written by Kent Bergsma
NOTE: For your four and five cylinder owners we know this is going to be more seals than you need, but the cost would not be that much different, and besides you will have a few spares if and when you need them.
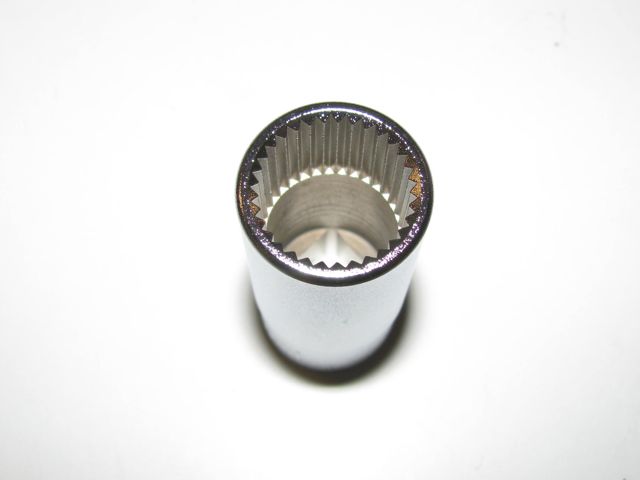
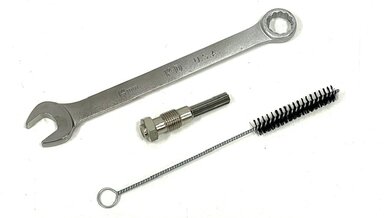
Here is a picture of the special socket needed to remove the delivery valve holders. No other tool will work. Look below to order separately.
ADDITIONAL NOTES: PLEASE READ!
Replacement is not difficult for the D.I.Y. mechanic, provided he has good instructions, the correct seals, the special socket needed to remove the housings AND a "bent" for cleanliness and careful attention to detail. Our special repair kit (as shown to the right) comes with all these except the last one. Only you can provide the needed care and cleanliness.
Most repairs are straight forward and uneventful but we have had reports of problems after the o-rings have been replaced. The first indication of a problem will come when you start the engine and hear a loud knocking or nailing noise from one of more of your injectors. Air in the fuel lines can cause this but if it does not go away after the engine warms up it usually means one of three things (2 directly related to the delivery valves and one related directly to the fuel injector nozzle.
1. Even the smallest spec of dirt entering the delivery valve or holder can cause valve to not seat properly against the copper washer or the valve itself to "hang up" leading to incorrect fuel delivery to the injector (this is what can cause the knock). Remember it will only take a spec of dirt and Kent thinks this is one of the biggest reason for post-repair injector nailing.
2. If any of the delivery valves are not installed properly, this can also lead to incorrect fuel delivery. This could mean one or more may have been installed without the spring, or the valve upside down, or the valve bound up during tightening.
3. If any spec of dirt works its way up to the fuel injector that can cause the nozzle tip inside the injector housing to "hang up" and this will also cause loud injector nailing.
Now you can understand why this job must be done with such care. The engine area around the injection pump needs to be super clean before you begin. Compressed air is a must. Keep both your tools and hands super clean during the job.
WARNING: When trouble shows up Kent suspects the following:
Right behind the problem with particle contamination, he believes some people get in trouble by pulling too much out of the pump, getting confused and then not putting everything back in correctly. The spring can fall out when the holder is lifted off the pump. Only the valve needs to come out in order to get to the crush washer, and it MUST go back in exactly with the same end up as when you removed it! Remove only the parts that are necessary to replace the oring and crush washer. Do not remove the outer barrel of the delivery valve or it may not re-seat properly.
RECOMMENDATIONS:
Take pictures of how things come out or draw pictures. Pay particular attention to how the valve is installed. On most engines you will find a machined band around the valve for reference. Do not mix parts. Place parts on super clean surface and clean and blow dry before re-oiling and installing.
If you are working with the injection pump on the engine resist the temptation to remove all of the delivery valve holders at one time. Instead, plan to replace only one crush washer and o-ring at a time. Once you install them, screw the delivery valve holder down by hand (if you lube the O-ring you should have no issues screwing it in by hand). Before you torque the holder sight down or lay a staright edge across the tops of the delivery valves to see if the one you worked on is sticking up higher than the others. If it is, you know you have a problem inside and will have to remove it and find the problem.
Our kit comes with complete instructions. These warnings and recommendations are shared here to help make you aware of potential problems if you choose to take this job on yourself.
If you want faster and smoother cold starts, easier bleeding, and more power under load, consider installing an electric fuel boost pump inline between the fuel tank and the injection pump on your old diesel. It takes the strain off the mechanical lift pump, which is always trying to suck fuel up to the engine from the tank. Other diesel manufacturers have done this! See related products below for our inexpensive and easy-to-install DIY kit.
_________________________________________________________________
How to view the PDF digital instructions:
Once you complete the purchase of this product you will be able to download the digital instructions immediately when you are logged in and on your personal account page (click on My Account). Any PDFs will show up under My PDF Manuals. You will be allowed three downloads, so please save the file on your machine for backup.
__________________________________________________________________
Related Products:
60x Parallel Glow Plug Replacement By Kent Bergsma - Download
Covers 190D 300D 300TD 300SDL 350SD 350SDL 1984 - 1993. Book 4 in our glow plug series explains how to properly remove and replace the glow plugs in the OM 601 602 and 603 diesel engines from 1984 to 1993.
601 602 603 and 606 Diesel Injection Pump Delivery Valve Seal Repair Kit with Socket Included
Leaking fuel injector pumps have become a very common problem in the 60x. engines produced from the mid 1980s to the mid 1990s. The early 60x.
60x Injection Pump Stop Lever Shaft Leak Fix Repair KIT
This is one of the more common oil leaks I see on the 602 (5 cylinder) and 603 (6 cylinder) diesel engines. In fact, I have seen it on almost every one of these engines I have worked on.
Heavy Duty Carbon Reamer for Pencil Glow Plug Chambers
PENCIL GLOW PLUGS ONLY!! WILL NOT WORK ON MODELS WITH THE OLD STYLE LARGE THREAD SERIES TYPE. For 1978 to 85 300SD Turbos / 1980 to 93 240D / 300D 300TD 300CD 190D 300SD 300SDL 350SDL. When was the last time your glow plug chambers were reamed out?
60x Parallel Glow Plug Replacement By Kent Bergsma - Download
Covers 190D 300D 300TD 300SDL 350SD 350SDL 1984 - 1993. Book 4 in our glow plug series explains how to properly remove and replace the glow plugs in the OM 601 602 and 603 diesel engines from 1984 to 1993.
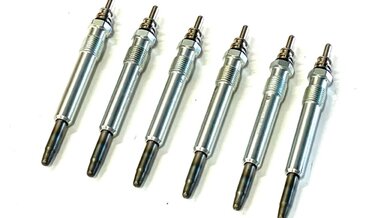
1995 E300 Diesel Glow Plug Set
6 high quality Bosch glow plugs ONLY.
These engines are know to seize glow plugs in the head. Always use correct anti-seize compound on the threads only when installing.
To see Kent's video on the problem of removing a stuck glow plug CLICK HERE.
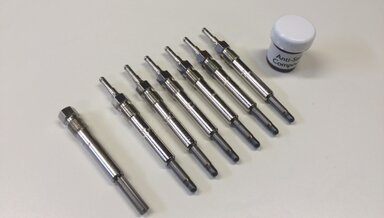
1996 to 1999 E300 Diesel Glow Plug Set with Reamer - Special
6 high quality Bosch glow plugs with Special carbon reamer included. This reamer should always be used to ream out the glow plug holes when changing your plugs to improve efficiency and glow plug life.
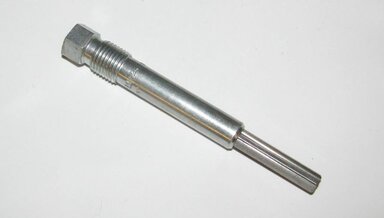
E300D Diesel All Steel Glow Plug Reamer - Long Port Version
Cleaning out the carbon is a MUST anytime you change glow plugs in these engines. If you don't do this your engine will not run as well a startup and it will shorten the life of the new plugs. This is a high quality custom made glow reamer. All steel body. Made by Kent Bergsma.
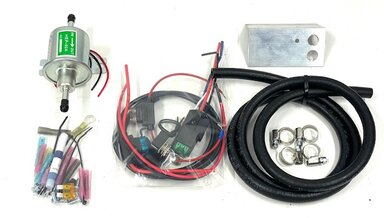
1978 to 1995 Universal Diesel Performance Fuel Boost Pump Kit
This can be installed in your W116 W126 W201 W124 diesel in 60 to 90 minutes. You will use the video instructions for installing it in a W123 (included), then you will make location modifications to fit your specific chassis.