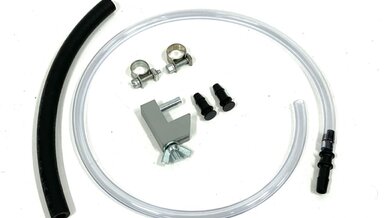
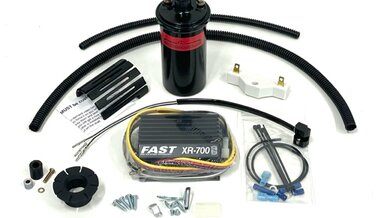
1958 to 1972 6-Cylinder Points-to-Electronic Ignition Performance Conversion Kit
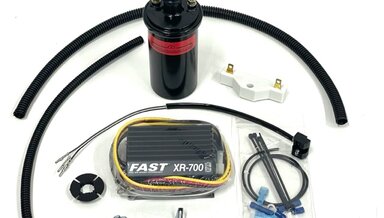
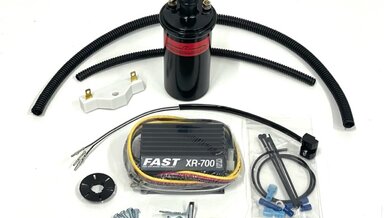
Best upgrade for 1958 to 1972 6 cylinder 220SE, 220S, 230, 250S, 280S, 250SE, 280SE, 280SEL, 230SL, 250SL, 280SL and 4 cylinder gas 190,
Kent's Factory Service Manuals collection is going on sale now. CLICK HERE.
Best upgrade for 1958 to 1972 6 cylinder 220SE, 220S, 230, 250S, 280S, 250SE, 280SE, 280SEL, 230SL, 250SL, 280SL and 4 cylinder gas 190,
After completing the pressure test on your CIS engine, you discover a problem. But how can you find out how to isolate and fix it? This is going to require some research on your part. Start by learning how the system works and how each component plays a part.
In this video, you will see how the gauges are hooked up to a 560SL and how the pressures are read. The length of this 30-minute shows the detail Kent has put into filming all the critical components of doing a KE-Jetronic fuel system pressure test.
This video is specific to K- jetronic fuel-injected engines from 1976 to 1985. This includes the 350, 450, and 280 engines in the R107, W116, W123, and early W126 gas Mercedes. In this 29-minute video. Kent will show you how to hook up the gauge, run the fuel pumps, and complete the test.
There are a few factory recommend procedures and tests you should do before you do an actual pressure test on a CIS fuel-injected engine. In this 20-minute training video, Kent will walk you through these procedures step-by-step.
To do proper system testing on CIS fuel injection, you must find a way to get the fuel pump or fuel pumps to run continuously without the engine running. This can not be done by just using the ignition key. In this 15-minute training video, Kent will show the options available to do this.
This video will help you decide if you want to try to do a fuel pressure test yourself. It is a fairly simple DIY job but will all the confusion and misinformation on the internet; one would believe it is a complicated process that is hard to understand.
6 black plastic clips as shown. Have these on hand any time you need to remove the two vent grills under the windshield
WARNING: MAKE CERTAIN your current injectors are yellow at the top. A restocking fee will apply if you place an order in error. For the 3.5 engine ONLY. See related products below if you have a 4.5.
Let's face it. These fuel tanks and now 50 years old and most are not squeaky clean inside. There is a fuel tank screen that will catch most particles if the screen is in good shape. But I have found that it will not catch the very fine rust particulates that are so common in these old cars.
PLEASE NOTE: Wire color may be all red or all black (depending on stock on hand) Performing some fuel pressure tests on your K-jet or KE-jet engine
If you own or are restoring a CIS fuel-injected Mercedes, a pressure tester is a must-have! This complete kit is not available, but now you can build your own. SEE related products below to purchase.
Removing the front rubber engine mounts requires getting under the car and going up inside a hole in the subframe to remove the main bolt. And it can be a bear! I don't know who they hired to tighten these at the factory, but he must have been a brute.
Excellent used delivery valve(not scored) and housing nut that mounts on the top of the injection pump. Includes threaded housing, spring, valve body, and valve. A bad delivery valve or valves can cause rough idle, smoke, poor power etc.
Best upgrade ever for your 180, 190, 200, or 220 gas engine. Even included the 190SL.
We know you want the best for your 560 engine. These ARE the best tune-up parts you can buy. To add new spark plugs see related products below:
Complete set of new ignition wires as shown.
People call these two units pressure regulators, but really only one of them is. In this xx minute video, Kent will explain how these are different, what each one does, how to adjust them, and how to test them with a hand pump vacuum tester.
In this 8-minute video, Kent will show you how to quickly depressurize your D-Jetronic fuel system before doing any injector service, replacing any hoses, or hooking up our fuel pressure tester.
In this xx minute instructional video Kent will walk you through the process of hooking up the gauge, taking the proper readings at idle and at rpm, adjusting the regulator, checking for internal leaks, and depressurizing before removal.
6/6/23 Update: Now with a liquid filled pressure gauge installed to increase accuracy and reliability. We customize, test and recalibrate this fuel pressure tester before we ship it.
In this 12-minute instructional video, Kent will show you how he installs the rear hood seal on the hoods of the R107 and the C107 built from 1972 to 1989.
Very important part for fresh air supply any time heater or ac is running.
If you own an R107 most likely this will be torn, missing, or rotting away. This helps with engine cooling as well as prevents engine fumes from getting into the cars vents.
This kit will put a smile on your face, especially if you have done it before the "old way." Watch the video below for full instructions on how to use this kit to do the fastest fuel system depressurization in the world!
Special purchase. Only four kits are available at this price. Unless your steering box is all worn out, these are the parts you need to replace to get your W123 steering tight again. Be sure to get a front-end alignment after installing these parts. No instructions are included for this kit.
New in 2023. This is "almost" ready to install. You will need to install some parts from your existing turbo charger once you remove it from the engine. Watch the video below for a full explanation.
This procedure is a must do anytime you install a new master cylinder or allow fluid to completely leak out of your master cylinder.
In this 30 minute instructional video Kent will use a 1972 300SEL 4.5 to show you how to remove the master cylinder with minimal spillage, how to install the tank and bench bleed a new master cylinder, and how to reinstall it with minimal brake fluid spillage while protecting your car's paint.
WARNING: MAKE CERTAIN your current injectors are blue/green at the top. A restocking fee will apply if you place an order in error. These are for the 4.5 engine only. See related products below for the 3.5. A video is worth a few thousand words.
Here is a 15 minute video that can really help you if you have small coolant leaks around your idle air valve. You will learn how easy it is to break the bolts when removing this valve, and your option to fix it.
In this 14 minute instructional video Kent will demonstrate how to remove and install a new thermostat in a 450 engine. Here you will see how tight it is to get install in a 300SEL 4.5, but other V8s will have better access.
In this 12 minute instructional video, Kent will demonstrate how to remove and replace the viscous fan clutch in a 1972 300SEL 4.5. Other topics covered will be cleaning and corrosion prevention. This video is included free with the purchase of our fan clutch install kit ( see below).
Are you dealing with any of these sunroof problems? Stuck roof, broken drive gears, bad cable, no lubrication, broken slides, headliner panel coming apart, installation problems, alignment, slow movement, headliner jamming, roof panel sits too low, and clutch spinning or not adjusted properly.
In this 33-minute instructional video, Kent will show you how to convert your old points ignition to an efficient modern electronic ignition. Rid yourself of those old high-maintenance distributor points forever.
In this 29-minute instructional video, Kent will show you how to convert your old points ignition to an efficient modern electronic ignition. Rid yourself of those old high-maintenance distributor points forever.
WARNING - WARNING - WARNING: BEFORE we ship this unit, we MUST have confirmation from you that you have removed the distributor cap, confirmed the size of your rotor ( see below), AND measured the points cam width and height. If your distributor is not exactly the same this kit WILL NOT WORK.
Most of the older 450 engine fan clutches are still original on most of the older unrestored V8 models from 1970 to 1980. If you are having problems with your 450 V8 running hot check the friction in your clutch. They are often worn out as they seem to never get changed.
This is seldom replaced. If you engine is taking over 15 minutes to get up to full operating temp then your thermostat is probably worn now. We got you covered with kit. We will get you the extra hardware, supplies and video instructions so you have the confidence to do this job yourself.
In this 18-minute instructional video, Kent will wrap up his 5-part series on fixing and servicing these old sunroofs. You will get to see just how well it works after proper repair, lubrication and adjustment. These are the subjects that are covered.
In this 20-minute instructional video, Kent will walk you through the steps of getting the steel sunroof panel installed properly back into the car's roof. The first step will require cleaning, inspection, and possible replacement of the plastic slides.
If you think your coolant hoses are "ok" they just may be, but it is what is hidden that could be a problem. When you remove those old hoses ( unless they have been replaced in the past 10 years) you may be shocked at what you find.
In this 23 minute highly detailed video Kent will show you to reasons why and some of the problems you will run into when you change these hoses on your own D-Jet engine. He will take the new parts and show you how to properly install them using the correct hose clamps, sealants and lubes.
We have been able to determine that most of the 500 series R107 and W126 of the early to mid 1980s have the same FID setup as the 380 engines.
Includes Kent's four detailed videos on every aspect of this job! This is our combination kit for DIY installation of a new front crank seal in an OM 616 four-cylinder and OM617 five-cylinder NON-turbo diesel engine. The price if purchased individually is $174.00.
I have hit my head so many times on the grill edge while working on R107 engines that I finally decided to do something about it while recently changing the fuel injectors on a 380SL.
In this 21 minute instructional video Kent will show you all his tips and tricks he used when doing an oil and filter change and a fuel filter change in his 280SL with the early 6 cylinder fuel injected engine.
In this 13 minute instructional video Kent will show you how to clean your sunroof cable tube, prep your cable for easy installation, lube the cable during installation, show preliminary clutch adjustement, and demonstrate how to get cable to engage the drive assembly using the power switch.
These are high quality German brand filters. Since mose of these cars are not driven regularly Kent recommends an oil change every 5000 miles or 2 years whichever comes first ( using quality oil) and a fuel fitler change every 10,000 miles or 2 years whichever comes
In this 24-minute detailed step-by-step video instruction, Kent will walk you through the process of how to successfully remove the old shocks and install new ones.