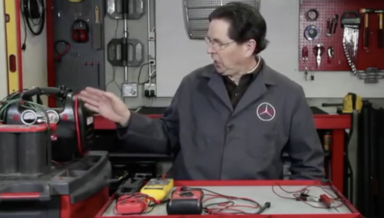
Automotive Electrical Troubleshooting Procedures 101- On Demand Video
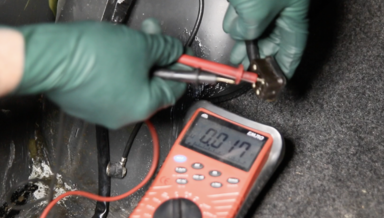
To many people, automotive electrical systems and testing are a big mystery. It is not as complicated as you might think.
Kent's Factory Service Manuals collection is going on sale now. CLICK HERE.
To many people, automotive electrical systems and testing are a big mystery. It is not as complicated as you might think.
These are the best wires you can get for your 1981 to 1985 380SL 380SLC 380SE 380SEL 380SEC and 500SEL. The coil wire is included. Consider replacing your cap, rotor, and CORRECT spark plugs at the same time. See related products below:
In this video, Kent will show you how he fixed his leaking tires on his chrome alloy wheels by using Miracle Paint. This is a full 22-minute step-by-step instructional video. Watch the video "trailer" below to give you a better understanding of what is involved in this procedure.
This kit was developed by Kent primarily to fix leaking chrome wheels. The free on-demand video that comes with this kit shows the detailed process of cleaning and filling the corroded areas along the edges of the inside of the wheel to seal them and stop annoying tire leaks.
Brand new high-quality aftermarket pump. This fits 1977 to 1991 U.S. chassis models 116, 107, 123, and 126 only with automatic climate control (push button panel.) You must test this pump by unplugging and applying 12-volt power.
Do not let anyone convince you to install some super platinum, iridium or kryptonite spark plug in your old Benz. They are just not capable of handling the richer fuel mixtures associated with these older engines.
Most 1988 to 1993 6 cylinder CIS fuel injection delivery (FID) systems are old and tired and have not been properly maintained. These include the W201 190E 2.6, the W124 260E 300E, 300CE, 300TE, the W126 300SE, and 300SEL, and the R129 300SL.
In this 19 minute instructional video, Kent takes an old 1970 280SE engine in the back of his shop and pulls the harmonic balancer off the front of the engine, removes the old seal, uses his custom-built puller to remove to seal race, and then shows you how to use the tools in his seal replacemen
When changing the front crank seal on your older 6 cylinder Mercedes you may or may not need to replace the sealing race that goes on over the front of the crankshaft.
Restore that original ride back onto your old W110, W111, W113 or W108. Nothing like a new set of Bilstein shock absorbers. These are the best.
Unless the engine has been overhauled most of these old 6 cylinder gas engines of the '60s and very early '70s are running around with their original front crank seal. Take a look under your car if you have one - I bet it will look a lot like the engine in the video below.
We are not kidding when we say to get them while you can. Genuine Mercedes replacements are now at $500. When you see prices go up like this you know that supply may be dwindling.
The original screws in these pumps get pretty nasty looking over time. When you try to clean them will a wire wheel the plating will be completely removed and the heads will rust again pretty quickly. Now you can install new original looking yellow zink plated screws and washers.
When doing a compression test you must properly seal the inner surface of the pre-chamber with the fuel injector hole adapter. Copper washers work the best for this to ensure a 100 percent seal. Do not use the engine's heat shield washers.
Kent has found and tested this newest LED light bulb that you can install on the backside of your instrument cluster to increase your instrument lighting on your older Mercedes. These particular bulbs will be much brighter with a more AMBER cast light, and they don't get hot!
This is the newest LED light bulb Kent has found and tested that you can install on the backside of your instrument cluster to increase your instrument lighting on your older Mercedes. These particular bulbs will be much brighter with a white light and they don't get hot!
This 25-minute video is a supplement to Kent's other instructions on replacing diesel engine front crank seals. It is offered free of charge with one of the seal replacement kits.
If you have ever changed the fluid in a 4matic transfer case you will understand why Kent is so excited about his new custom pressure bottle.
There seems to always be a better way to do it.
In this video Kent will share some set up tips as well as explain what is in the compression tester and an overview of how it is used.
This video will show you how to remove the front crank seal race using the factory tool and using Kent's custom puller. It will also demonstrate a very easy way to install a new replacement race before installing a new seal.
LOOK closely. What you see is what you get. No glass. Plan for parts only.
When you see how clean these are you realize they were not mounted on a car very long. This is a set of right and left frames with good reflectors. Will need cleaning and polishing, bulbs and glass lenses to complete.
Good used bracket as shown.
NEW O.E genuine Mercedes front rubber seal plus aftermarket rear rubber seal. Please note this kit DOES NOT INCLUDE the two rigid side seals. We are no longer able to obtain these but you can obtain them from Mercedes Benz directly if you are an owner of a 1966 to 1985 Mercedes with a sunroof.
Great find, especially if you are a W111 coupe convertible enthusiast. This introduction manual is intended to familiarize technical personnel with the W109 and W111 series vehicles and the M116 V8 engine.
Very Rare. One of the first of these types of manuals released. This introduction manual is intended to familiarize technical personnel with the Registration Year 1973 Passenger Cars vehicles.
This hose assembly was used on the fuel delivery systems in the late 1970s and early 1980s. Installed on some R107 450SL and 450SLC, W116 450SE / L and 280SE, and the W123 280E and 280CE. Be sure to check your car before ordering to make certain this hose is installed.
This introduction manual is intended to familiarize technical personnel with model year 1994 202 series vehicles. This covers changes and new developments, it does not cover all repair information on the above chassis. Good condition as shown, some edge wear.
Those old hardened and discolored plastic fuel hoses in your diesel engine compartment probably need to be replaced. When they crack and break you can dump a ton of fuel out on the road before your engine quits and leaves you stranded.
Kent modified this puller and developed a procedure to remove the front crank seal race so the job could be affordable from the DIY mechanic. This costs less than half the cost of the factory tool.
Two new wing nuts. These have wider wings so they are easier to loosen and tighten. Replace the nut that most people install after the wing nut has been lost!
Wheel wrench as shown. For 17mm head bolts. Original. Only one available.
Excellent used emergency stop lever as shown with good rod bushing. rod spring and C-clip included. Stop decal in good condition.
Kent has found and tested this newest LED light bulb that you can install on the backside of your instrument cluster to increase your instrument lighting on your older Mercedes. These particular bulbs will be much brighter with a more yellow cast warm white light, and they don't get hot!
PDF DOWNLOAD FINALLY AVAILABLE of our popular 'Preventing Catastrophic V8 Engine Failure' Manual!!
Applies to the following chassis: 111, 108, 109, 107, 116, and 126. Includes 3.5, 4.5, 350, 380, 450, 500, 420, and 560 V8 engines from 1970 to 1991.
Kent will get right up behind the rear end hub plate and show you close up how to remove and replace a sway bar link. This is not a difficult job especially if you follow the sequence shown in this 7- minute video.
In this 13-minute video instruction Kent will show you how to make your own accumulator tee hose connection either using parts from. our kit ( see below) or parts you purchase yourself. This video is included free with the purchase of our kit.
This kit will give you everything you need to fix the leaking or aged Tee hose between the fuel damper and the fuel accumulator on most 1977 to 1980 fuel delivery systems. Watch the video below to learn why this is needed.
Kent will take you over to his workbench and completely take apart a rusty and old fuel delivery system from a 1980 450SL and put it all back together again with some shiney new paint and parts supplied in his special kit for these cars. This video runs for 24 minutes.
In this 30 minute-long video Kent will walk you through what he did for the rear suspension on his 1983 240D.
Brand new upper and lower radiator hoses as shown.
Brand new aftermarket fuel accumulator for the 1986 to 1991 V8 engines. It is mounted near the fuel filter under the back end of the car and hardly ever gets replaced. What does it do and how do you know if it is bad.
Also will work on (some but not all) 1976 to 1980 280SE, 280SEL, 280SL and 280E. Brand new aftermarket fuel accumulator for the 1976 to 1985 V8 engines. It is mounted near the fuel filter under the back end of the car and hardly ever gets replaced.
In this 46 minute very detailed step-by-step video instruction, Kent will show you how to remove the fuel delivery system from your 1986 to 1991 420SEL, 300SE, 300SEL, 560SEL, 560SL, and 560SEC, take it over to your bench and take it all apart, install new pumps, filter, accumulator, and hoses, t
This 17-minute video will cover the removal of an old Hirschmann power antenna and then Kent will show you how to troubleshoot the wiring plug in the car to see if you are getting proper power back to the antenna. No sense in replacing a faulty antenna until you make sure your wiring is OK!
R107 power Hirschmann antenna are no longer available new. It is possible to remove and repair the old Hirschmann antenna if you are willing to dig in and spend time cleaning, adjusting, lubing, etc.
In this 30-minute instructional video, Kent will walk you through the steps to remove your old antenna, test and troubleshoot your wiring plug coming to the antenna, and install our aftermarket antenna using the special wiring connectors we include in the kit.