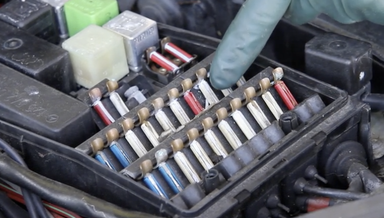
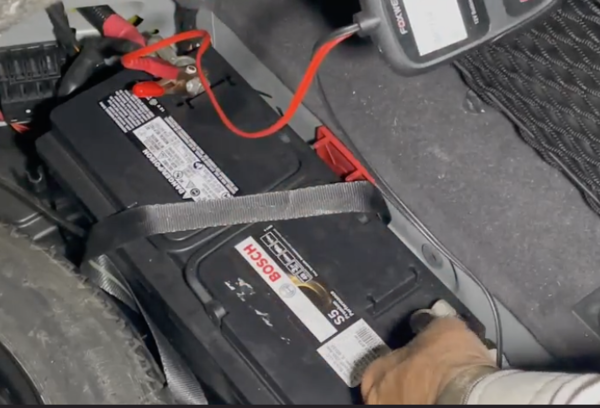
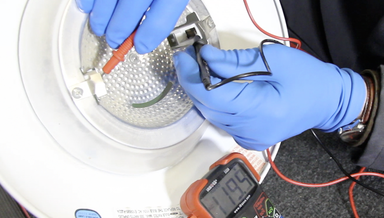
Automotive Electrical Troubleshooting Procedures - On Demand Video
To many people, automotive electrical systems and testing are a big mystery. It is not as complicated as you might think.
Kent's Factory Service Manuals collection is going on sale now. CLICK HERE.
To many people, automotive electrical systems and testing are a big mystery. It is not as complicated as you might think.
When an old Mercedes ( or any other car for that matter ) has sat idle for over a year it can be a challenge to get it safely back on the road again. If it has sat idle for more than 5 years you may find it difficult to even get the engine running.
In this 10 minute video class Kent shows you what you should initially look for when checking out an older Mercedes for sale. He routinely does a quick 3 to 5 minute walk around to determine if the car passes his priority three part test.
Those three areas on inspection are:
There is nothing better than a good buff and wax to bring out the shine on an old Benz. Particularly if the car has not been waxed in a couple years! The results are directly related to the amount of work you put into it.
In this video Kent shares his secrets on how to make the inside of an old Benz look like new again. Now granted, you must have a reasonably good car to start with. He is not going to show you how to reupholster, change seats and door panels, etc.
This heavy, specially made fiberglass mat has thick bias ply fiberglass cloth, and the mat is very stiff even before you add resin or Miracle Paint. SOLD IN PRECUT PIECE 12" x 15".
Born out of frustration this twin chamber plastic bottle has solved two of Kent's biggest head aches when brake bleeding or flushing brake systems.
This vacuum line is white and is 4 mm in size. It is used on all 107 108 109 110 111 113 114 115 116 123 124 126 chassis. You can use it to replace any hard vacuum line on the engine.
Mercedes 114, 115, 107, 116, 123, 126, 124, and 201 chassis window trim has a super strong anodized coating that is impervious to hand polishing but still can oxidize when exposed to harsh environmental elements. When this happens the trim becomes spotted and milky in color and it is NOT pretty!
Can be successfully applied to all Mercedes Alloy (non chrome) Silver Wheels from 1970 to 1995. 108, 109, 107, 114, 115, 116, 123, 201, 126 and 124 chassis. Most of us have to admit that stained and peeling paint on Mercedes alloy wheels is ugly on any model.
Off low mileage coupe and in dry storage for the past 25 years. Excellent condition as shown.
6 "German style" non-cutting hose clamps as shown. These are wider than most to better seal the hose to the fitting. See our other hose clamp assortments below.
Kent walks you through replacing a trunk seal on a 1970 280SL. The video is 13 minutes long and covers removing the old seal, cleaning the groove, trial fitting the new seal, and the final gluing procedure.
In this detailed 22-minute video instruction, Kent will show you how to use his kit to perform a power drain on most 1965 to 1995 automatic transmission.
Yes, YOU can fully drain all your transmission without using any type of "power flush." Full detailed video instructions are included. This kit is easy to connect and the process is quick and clean. Watch Kent's YouTube video below for full details.
You will receive ten each of the following sizes: 8/12, 10/16, and 12/22. These are much better than U.S. style hose clamps that cut into the hose.
You can not believe how easy it is to move and adjust your old seat after lubrication the tracks with this amazing lubricant! You will receive two full tubes plus the extension nozzle. This is more than enough lube to do the seats with four tracks on each side.
These quality 6.5 inch wire cutters are made of special steel, the blades are high-frequency hardened steel. Suitable for cutting soft copper wire, plastic wire, small cable, aluminum wire, soft alloy wire, jewelry making, multifunctional manual edge banding pliers.
In this 9-minute instructional video, Kent explains how to set up his injection pump cleaning and testing kit ( available separately ), and use it to clean out old fuel injection pumps of gum and grime, and then how to test them to make sure they are delivery fuel through every line.
Watch the video below to understand what this kit can do. Ensure your injection pump is thoroughly cleaned and lubricated before starting the engine after long storage.
This fits a number of lmid 1960s to early 1970s models with automatic transmission. 250SL 280SL 250S 250SE 280S 280SE 280SE 300SEL. Check under the front of your car to make sure this matches what you have before ordering.
Flushes Out Old Grease and Repacks Bearings with Less Mess. This Handy Packer works on bearings up to 3 1/2" O.D.
Many of these, especially along the bottom of the hard are hard and brittle and will break when removing the panel. Tilt and twist to remove and install in the holde. Sold in a bag of 24.
These WILL NOT work on your original injectors. They will ONLY work on our new replacements (see below) These plugs are a good alternatiive to the damaged originals on your D-Jetronic fuel injected engine IF you are installing our new injectors.
New tensioner as shown. No specific instructions are available but this can be installed from outside the engine once you get access the the hold down bolts.
Nice to have a few extra 13mm sockets around. This is the first tool that gets lost when working on old Mercedes. The tall shoulder inside helps to hold the nut or bolt in a position to make it easier to start the threads.
If your front seat fore and aft adjustment handle is cracked or broken, we have the right replacement upgrade for you, which is stronger and more comfortable to pull on. This is a beginner DIY job on most seats. You cut and chisel the old handle off and bolt on this new handle.
Best upgrade for 1958 to 1972 6 cylinder 220SE, 220S, 230, 250S, 280S, 250SE, 280SE, 280SEL, 230SL, 250SL, 280SL and 4 cylinder gas 190,
WARNING: MAKE CERTAIN your current injectors are yellow at the top. A restocking fee will apply if you place an order in error. For the 3.5 engine ONLY. See related products below if you have a 4.5.
Let's face it. These fuel tanks and now 50 years old and most are not squeaky clean inside. There is a fuel tank screen that will catch most particles if the screen is in good shape. But I have found that it will not catch the very fine rust particulates that are so common in these old cars.
People call these two units pressure regulators, but really only one of them is. In this xx minute video, Kent will explain how these are different, what each one does, how to adjust them, and how to test them with a hand pump vacuum tester.
In this 8-minute video, Kent will show you how to quickly depressurize your D-Jetronic fuel system before doing any injector service, replacing any hoses, or hooking up our fuel pressure tester.
In this xx minute instructional video Kent will walk you through the process of hooking up the gauge, taking the proper readings at idle and at rpm, adjusting the regulator, checking for internal leaks, and depressurizing before removal.
6/6/23 Update: Now with a liquid filled pressure gauge installed to increase accuracy and reliability. We customize, test and recalibrate this fuel pressure tester before we ship it.
This kit will put a smile on your face, especially if you have done it before the "old way." Watch the video below for full instructions on how to use this kit to do the fastest fuel system depressurization in the world!
This procedure is a must do anytime you install a new master cylinder or allow fluid to completely leak out of your master cylinder.
In this 30 minute instructional video Kent will use a 1972 300SEL 4.5 to show you how to remove the master cylinder with minimal spillage, how to install the tank and bench bleed a new master cylinder, and how to reinstall it with minimal brake fluid spillage while protecting your car's paint.
WARNING: MAKE CERTAIN your current injectors are blue/green at the top. A restocking fee will apply if you place an order in error. These are for the 4.5 engine only. See related products below for the 3.5. A video is worth a few thousand words.
Are you dealing with any of these sunroof problems? Stuck roof, broken drive gears, bad cable, no lubrication, broken slides, headliner panel coming apart, installation problems, alignment, slow movement, headliner jamming, roof panel sits too low, and clutch spinning or not adjusted properly.
In this 33-minute instructional video, Kent will show you how to convert your old points ignition to an efficient modern electronic ignition. Rid yourself of those old high-maintenance distributor points forever.
WARNING - WARNING - WARNING: BEFORE we ship this unit, we MUST have confirmation from you that you have removed the distributor cap, confirmed the size of your rotor ( see below), AND measured the points cam width and height. If your distributor is not exactly the same this kit WILL NOT WORK.
In this 20-minute instructional video, Kent will walk you through the steps of getting the steel sunroof panel installed properly back into the car's roof. The first step will require cleaning, inspection, and possible replacement of the plastic slides.
In this 23 minute highly detailed video Kent will show you to reasons why and some of the problems you will run into when you change these hoses on your own D-Jet engine. He will take the new parts and show you how to properly install them using the correct hose clamps, sealants and lubes.
In this 21 minute instructional video Kent will show you all his tips and tricks he used when doing an oil and filter change and a fuel filter change in his 280SL with the early 6 cylinder fuel injected engine.
In this 13 minute instructional video Kent will show you how to clean your sunroof cable tube, prep your cable for easy installation, lube the cable during installation, show preliminary clutch adjustement, and demonstrate how to get cable to engage the drive assembly using the power switch.
These are high quality German brand filters. Since mose of these cars are not driven regularly Kent recommends an oil change every 5000 miles or 2 years whichever comes first ( using quality oil) and a fuel fitler change every 10,000 miles or 2 years whichever comes
In this 24-minute detailed step-by-step video instruction, Kent will walk you through the process of how to successfully remove the old shocks and install new ones.
A great alternative to Bilstein shocks at almost half the price! Watch the video below as Kent explains why he put these shocks on his W113 280SL. These are special order parts and depending on supply issues it may take up to 5 days before they can be shipped.