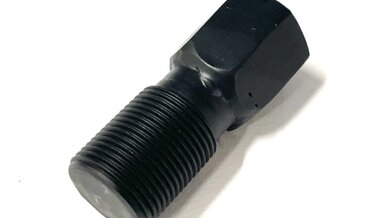
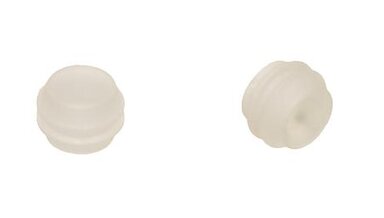
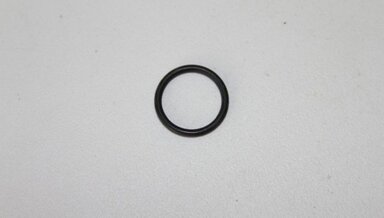
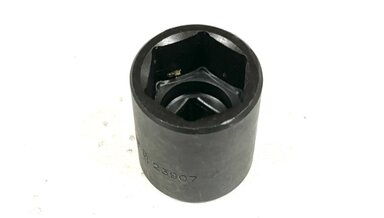
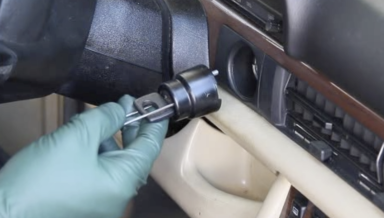
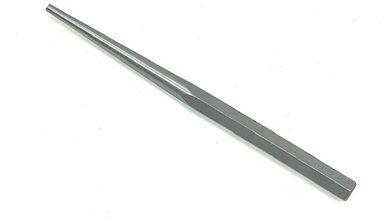
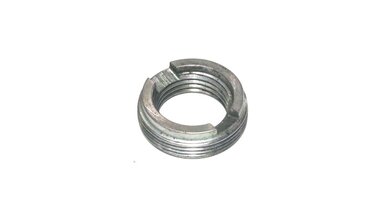
Special Curved 12mm Wrench for OM617 Turbo Engine Exhaust Pipe Flange nuts
Watch the video below to see how this special wrench is used on the three nuts holding the exhaust downpipe to the turbocharger exhaust flange.
Check out Kent's 400+ On Demand Video Instructions. CLICK HERE to view ALL.
Watch the video below to see how this special wrench is used on the three nuts holding the exhaust downpipe to the turbocharger exhaust flange.
With this deluxe kit, you can reduce frustration and save big when doing it yourself. Watch the videos below to learn more! AMG owners note: THIS WILL NOT FIT THE AMG MODEL M113 ENGINES.
On a regular basis, Kent and Gerson custom make tools to make certain jobs go easier and faster. So is the case with this long reach ratchet. It was developed to get glow plugs out of the older diesel engines without having to remove the hard lines.
VERY limited stock. These are the exact fuses you will receive.
This is a stress reduction and time-saving video. Those little airmatic fittings can be a real pain when you go to push the compressed air line into them to lock.
10 red plastic clips are included as shown. There are a number of reasons why you would want to remove the center side trim on your older Mercedes. You may just want to clean and detail behind them (it does get pretty dirty back there over the years).
PLEASE NOTE: Manual(s) are now available in PDF format and are available for viewing when you log into your account at Mercedessource. No printed manuals are shipped. If you own a Mercedes with the M117 V8 engine timing chain failure can really ruin your day!
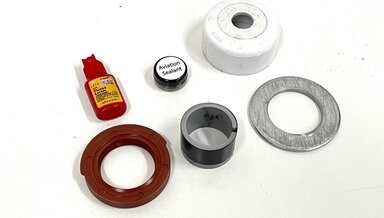
This is a genuine Mercedes used part. These are much stronger than the aftermarket ones available. Genuine are no longer made. No damage to the slot or the threads. Only for models listed. Does not work on later aluminum diesel engines. Collar nut holds pre-chamber in cylinder head.
PLEASE NOTE: Manual(s) are now available in PDF format and are available for viewing when you log into your account at Mercedessource.
In this 19-minute instructional video, Kent will walk you through the process of removing the drive belt, explain what you should inspect at the front of your engine, and show you how to install the parts that always seem to wear out around 100K miles.
Emergency brake shoe maintenance is often neglected because the rear brake disc / rotor has to be removed to inspect and repair them. If the car has ever been driven a long distance with the emergency brake on, expect problems.
If you have a VERY slow leak in your Airmatic Mercedes, trying to find it can be very frustrating. It could be in the valve block, one of the lines, or the Airmatic strut itself. Small leaks in the strut can be the hardest to find if you cannot hear it.
Application: Fits all 5-cylinder 116 and 126 Chassis diesel engines 300SD from 1978 to 1985 and all 123 Chassis 300D, 300CD, and
Are you having trouble finding the leak in your Airmatic Mercedes? Do not throw parts at it until you do the proper testes. Watch the video below and Kent will explain and demonstrate how this tester can save you $$ and GREAT frustration.
Kent came up with this kit because of all the times he replaced e-brake shoes only to end up with battered knuckles and extreme headaches. This video is included free with the purchase of the toolkit.
This kit has enough red clips (60) to do both sides on the 123 240D, 300D, 300TD, 300CD, 280E, and 280CE. You will receive the best tool to remove the side trim and the best tool to remove the old red clips from the side trim after removal.
Good working parts as shown. Oil pressure unit has been REMOVED. PARTS ONLY.
Mercedes 114, 115, 107, 116, 123, 126, 124, and 201 chassis window trim has a super strong anodized coating that is impervious to hand polishing but still can oxidize when exposed to harsh environmental elements. When this happens the trim becomes spotted and milky in color and it is NOT pretty!
This part wears out over time and can cause a number of problems. Door clunking going over rough ground, door not closing easily, door accidentally popping open while driving, or you find yourself slamming the door just to get it fully closed.
I call this the hidden and forgotten bushing. Why? Because you can not see it to inspect it, it hardly ever gets changed. When these bushings wear out you will feel "weird" movement in your rear end, especially going over rough ground.
Unless the engine has been overhauled most of these old 6 cylinder gas engines of the '60s and very early '70s are running around with their original front crank seal. Take a look under your car if you have one - I bet it will look a lot like the engine in the video below.
VERY high-quality socket as shown.
This is now becoming one of the most common oil leaks in 1968 to 1985 diesel engines. Let's face it. These engines are getting older and the rubber seal is wearing and becoming more brittle with time.
Failure is more common and happens more often with these thermostats due to the internal temperature probe that goes down through the center of the housing. It is much better to replace this as a preventative measure to prevent engine overheating.
In this 10-minute instructional video, Kent will show you the location of the thermostat on both engines, explain why they should be replaced every 40,000 to 50,000 miles, and wrap up with installation tips that should help you do it yourself.
Custom ordered for a better fit than original! special Oring seal for the bowden cable housing where it connects to the right side of the automatic transmission. This is a common leak area and you may be fooled into thinking it is leaking out of the pan gasket.
Includes Kent's four detailed videos on every aspect of this job! This is now becoming one of the most common oil leaks in 1968 to 1985 diesel engines. Let's face it.
This is not a difficult part to replace, but it does require you to remove the belt and one pulley. A good time to replace this part is at the 80 to 100K inspection interval since you will already be removing / replacing the belt and pulleys.
Good usable trailing arm as shown. No rust through. This was removed from a 1982 W123 300TD, so if you install it in another chassis, you will have to change the emergency brake cable. PLEASE NOTE.
For all 3.5, 3.8, and 4.2 liter V8 engines from 1969 to 1991 280SE 3.5, 300SEL 3.5, 380SE, 380SEC, 380SEL, 380SL and 420SEL. These THREE are the upper (and easily accessible) plastic guide rails that most often break due to age and heat.
The bowden cable runs from the transmission to the throttle linkage on many Mercedes from the early 1980's up through the early mid 1990's. When this cable fails or is out of adjustment the transmission will either shift too early or too late.
Contains all supplies and video instructions you need - except a multitool (see description. )Ever wish you could get rid of the annoying wiper scratches on your front windshield (or rear hatch glass if you have a rear wiper)?
You will save $$ by purchasing the complete kit. Each item can be purchased separately in the related products below. Click on each one to learn the specifics of each product included here.
There are a number of things that can go wrong with a W123 instrument cluster.
Emergency brake shoe maintenance is often neglected because the rear brake disc / rotor has to be removed to inspect and repair them. If the car has ever been driven a long distance with the emergency brake on, expect problems.
This socket is the correct size to use with our R107 Fuel Tank Screen Removal Tool ( See below:). It is a heavy-walled 27 mm black impact grade socket made in the U.S.A.
We love the quality of Bremi wires. Kent prefers them on his own cars. We even throw in some silicone grease and show you how to apply it.
This is a special pre-chamber threaded fitting that you can attach to YOUR slide hammer to remove the pre chamber on 1990 to 1991 350SD 350SDL (126 chassis), 1990 to 1993 300D 2.5 (124 chassis), and 1992 to 1995 300SD / S350 (140 chassis). You will need to own or purchase a 5 lb slide hammer a
In this video, Kent will show you how to safely and cleanly remove the fuel from the tank on your older Benz. You will need to drain the fuel anytime you replace the back end hoses, the tank filter screen, the fuel pump or the fuel filter.
8/2022 Update: We have modifed a new wrench for this kit so it may not look the same as that shown in previous YouTube videos, but it will do the same or even better job! We do sell the water pumps individually, but we decided to offer this complete kit to make a diesel pump installation go easie
This is a set of four STAINLESS STEEL custom machined Torx head door striker bolts. They will eliminate many headaches related to door closing issues on the W126 and 560SL doors.
PLEASE NOTE: Manual(s) are now available in PDF format and are available for viewing when you log into your account at Mercedessource.
This video is not only going to show you how to remove and replace the “SNAP cap” style tumbler, but it also going to explain the theory of operation and how to avoid certain pitfalls when doing this job yourself. And YES, there are pitfalls.
On most D-jetronic engines, the fuel injector wiring plugs are hard and brittle, and the boots are torn or missing altogether. You may say, "If it is working, why fix it? Watch the videos below to understand why this is important and how easy it would be for you to do it yourself.
If your serpentine belt is starting to crack or the back side is worn smooth, you need to replace it. If you are hearing strange noises from the front of your 1986 to 1993 six cylinder gas engine, you will need to remove the belt to troubleshoot the problem.
In this 13-and-a-half-minute instruction video, Kent will show you the critical steps in removing and replacing the motor mounts in a W211 E500. The key steps will apply to all M112 and M113 engines, although specific details are not covered for every model.